This article was translated from Japanese by AI. The original is at https://blog.semnil.com/post-1468.html
In an earlier article, I wrote about building URX Router, an unofficial application for controlling the YAMAHA URX series from a PC. Since then, while continuing to develop URX Router and URX LCD Simulator, which reproduces the unit’s screen (the touchscreen, also called the LCD) in a browser, I have examined the URX44V in detail. This article sums up the good points and the complaints I found along the way, and the settings I recommend.
This article covers only the case where the unit is used in Standard Mode and set up for live streaming without DAW Integration (the link with Cubase / Nuendo / MixKey; MixKey is Steinberg’s mixer software for streamers). While Simple Mode (the unit’s other operation mode; both are explained later) or DAW Integration is active, the available functions and routing are restricted, so what is written here does not apply.
- Unit used for testing: URX44V (firmware V1.3.1.0 / Device Center 2.2.1; Device Center is Yamaha’s software included in TOOLS for MGX / URX, used for the unit’s settings and firmware updates). The contents of this article are results confirmed on the URX44V
- User guide referred to: URX44V URX44 URX22 User Guide (the edition for firmware V1.3)
- Basis for the routing: the official block diagram (PDF), plus results confirmed on an actual URX44V for what the diagram does not show
These may change with future firmware updates.
All the screenshots of the unit’s screen in this article are from URX LCD Simulator performing the same operations; none of them are photos of the actual unit (only the image of the Ducker warning is a URX Router screen). The unit’s screen is a glossy 4.3-inch touchscreen, and the user guide does not describe any function for saving the screen as an image. I photographed the actual screen many times during testing, but the hand holding the camera and the room were reflected, dust and fingerprints showed up, and the black background came out bluish grey, so none of the photos were usable in an article. The images under “Known bugs” also show the simulator reproducing behavior I confirmed on an actual URX44V.
- Conclusion
- The good point first: low-noise mic preamps
- Routing is less flexible than expected
- Only STEREO and MIX 1 / MIX 2 can build a mix
- Mono channel input sources are linked in pairs
- A channel’s direct out can only be taken before the fader
- Each output can only select from a limited set of sources
- Only some channels have a Ducker
- Raising the sample rate disables many things
- Output assignments cannot be switched by scenes
- DAW Integration and the Stream Deck plugin control only a narrow range
- Recommended settings
- To make the Ducker apply to the stream, assign a bus (STEREO / MIX) to the USB output
- When you mute the mic, turn the Ducker off as well
- For multiple voices, key the Ducker from a MIX bus; for a stereo key, raise the threshold
- Build the sound returned to a call on MIX 1
- To use an output COMPANDER as a safety net, insert it on the bus for the stream with settings that barely affect the sound
- Do not rely on Clip Safe; leave headroom in A.Gain
- Supplement: making MONO available on the speaker output
- Personal complaints
- Known bugs
- Related documents
Conclusion
Here is the conclusion first. The details are in each section.
- The mic preamps are low-noise, and the gain goes up to +70 dB. Even the low-output SM7B works without adding an inline preamp.
- Other points that make it easy to use for streaming: it has a built-in Ducker, it has several USB outputs (USB MAIN A / B / C and USB SUB), it has a STREAMING output that can be delayed, and the URX44 / URX44V can record to microSD.
- Routing in the built-in mixer means choosing within fixed signal paths, so it is not very flexible. Only three buses can build a mix (STEREO and MIX 1 / MIX 2), and the output assignments (Output Patch, USB outputs, MONITOR sources) cannot be switched by scenes.
- The most important point: if you assign a channel directly to a USB output, neither the fader nor the Ducker affects what goes to the stream. Put the sound for the stream on the USB output through a bus (STEREO or MIX).
- The official ways to control the unit from a PC (DAW Integration, the Stream Deck plugin) reach only a narrow range, and while DAW Integration is active the STEREO bus and scenes cannot be used.
- You cannot put a limiter that reliably holds the true peak in front of USB MAIN. The final peak control has to be left to a filter in OBS.
- The unit’s screen cannot show input channels and buses together, so checking bus levels during a stream requires switching banks.
- There are small bugs, such as places where the user guide and the unit’s behavior disagree (for example, +48V and HI-Z can be on at the same time) and a clock that does not support daylight saving time.
For these reasons, honestly, I am not sure at the moment whom I would recommend this product to. The mic preamps are good and the features you need for streaming are there, but using it as a streaming mixer takes the effort of understanding the routing constraints and making settings like those in “Recommended settings”, and the official ways to control it from a PC are limited.
The settings I recommend for streaming are as follows (details in “Recommended settings”).
- When you mute the mic, turn the Ducker off as well
- To have the Ducker respond to several voices, gather the voices on a MIX bus and use it as the key. When a stereo source is the key, set the threshold higher
- Build the sound returned to the person on a call on MIX 1, and do not send that person’s channel to MIX 1
- If you use an output COMPANDER as a safety net, insert it on the bus that goes to the stream and set Threshold 0 dB, Ratio 1:1, Width 90 dB, Attack 0 ms
- Do not rely on Clip Safe; leave headroom in A.Gain (the mic preamp gain)
Differences among the three models that matter for this article
The contents of this article were confirmed on the URX44V. I confirmed from official material (the specifications page and the block diagram) that the URX22 / URX44 have the same mechanisms, but I have not confirmed them on actual units. Channel numbers in the text are those of the URX44 / URX44V. The model differences that matter for this article are as follows.
| URX22 | URX44 | URX44V | |
|---|---|---|---|
| Mic inputs (combo jacks) | 2 | 4 | 4 |
| Input channels | 2 mono (CH1–2) + 4 stereo (CH3/4–9/10) | 4 mono (CH1–4) + 4 stereo (CH5/6–11/12) | 4 mono (CH1–4) + 4 stereo (CH5/6–11/12) |
| Ducker | 4 (one per stereo channel) | 4 (same) | 4 (same) |
| Analog outputs | MAIN OUT | MAIN OUT + LINE OUT | MAIN OUT + LINE OUT |
| microSD recording | No | Yes (up to 16 tracks) | Yes (up to 16 tracks) |
| HDMI | No | No | Input and pass-through (video capture) |
| How this article was checked | Based on official material (not confirmed on a unit) | Based on official material (not confirmed on a unit) | Confirmed on a unit |
The good point first: low-noise mic preamps
Before the complaints, the good points. The mic preamps are low-noise, with more gain headroom than Yamaha’s own URX-C / UR-MK3 series. On the manufacturer’s specifications page, the equivalent input noise (EIN: the noise the preamp itself produces, expressed as an input level; lower means less noise) of the URX22 / URX44 / URX44V mic inputs is -128 dBu (A-weighted), and the gain range is 78 dB. That 78 dB is the span from -8 dB to +70 dB, and the highest gain you can actually set is +70 dB (User Guide (PDF), page 179, “Technical specifications”). The URX22C / URX44C / UR12MK3 / UR22MK3, shown side by side on the same specifications page, have a gain range of 54 dB, and their equivalent input noise is not listed.
A typical low-output dynamic mic is the Shure SM7B. Its output is only 1.12 mV at 1 Pa (-59 dBV/Pa) (Shure spec sheet), and a Shure support article says to choose a preamp with at least 60 dB of gain for voice-over (SM7B Output Level and Preamp Gain Specifications). I use the URX44V with an SM7B at A.Gain +66 dB (4 dB short of the +70 dB maximum), and I feel it performs well enough that I do not need a separate preamp such as the Cloudlifter CL-1 (a device placed between the mic and the audio interface that runs on +48V phantom power and adds up to +25 dB of gain; Cloud Microphones product page, FAQ).
Routing is less flexible than expected
The URX has a built-in mixer, and judging from the unit’s screen alone it looks as if you could build all kinds of paths freely. In reality, though, the routing cannot be wired freely; you choose among a few options within the fixed signal paths of the block diagram.
Even so, reading the block diagram does not tell you everything. The diagram shows the signal paths, but some things cannot be read from it, such as which combinations you can select on the unit’s screen and where along the path each function takes its signal. While developing URX Router, I confirmed such points one by one on an actual URX44V, and this article includes facts confirmed that way. For example, the source combinations available for the USB outputs, the absence of a “none” option for the STREAMING source, the Ducker key not being affected by the fader or ON, and [MONO] reaching MAIN OUT when MAIN OUT’s source is a MONITOR are all results confirmed on the unit.
Only STEREO and MIX 1 / MIX 2 can build a mix
Only three buses can mix channels into separate mixes: the STEREO bus and MIX 1 / MIX 2 (FX 1 / FX 2 are buses for effects). Separating the mix for the stream from the monitor mix you listen to uses up either STEREO or a MIX on its own. Also, the send from a MIX to STEREO (TO ST) is on/off only, and its send level cannot be adjusted.
Every send from a channel to each bus is wired from the start and cannot be removed. Each send has only on/off and a level, and you stop an unused send by setting its level to the minimum (-∞) or turning it off. The URX44V has 48 of these always-wired sends (40 from the 8 channels to STEREO, MIX 1, MIX 2, FX 1 and FX 2 each; 6 from the 2 FX channels to STEREO, MIX 1 and MIX 2 each; and the 2 TO ST sends from MIX 1 and MIX 2 to STEREO). That is a lot, but unused sends left at -∞ do not affect the sound, so you do not need to set all of them.
Mono channel input sources are linked in pairs
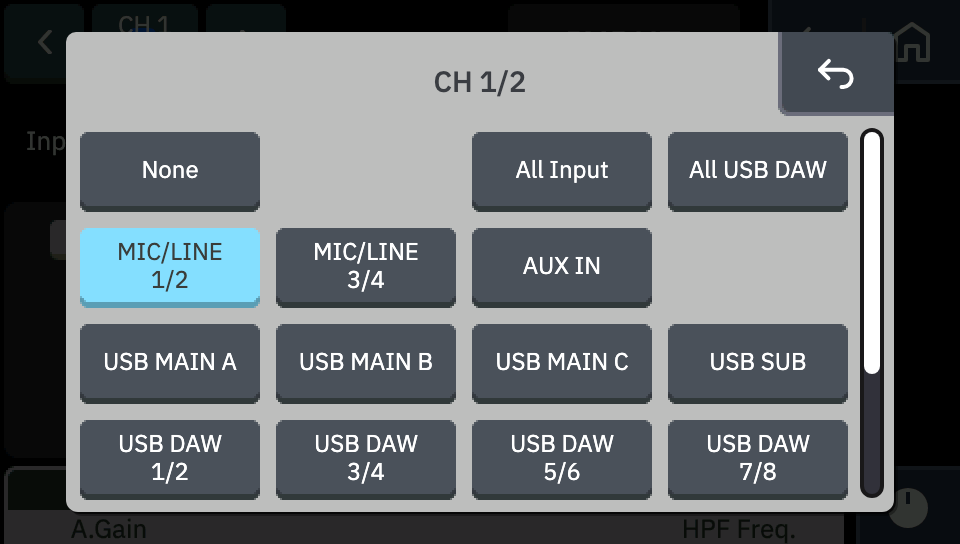
The mono channels CH1–4 are paired as CH1/2 and CH3/4, and selecting an input source on one sets the same source on the other. For example, selecting MIC/LINE 1/2 on CH1 also sets CH2 to MIC/LINE 1/2. You cannot have a mic on CH1 and audio from USB on CH2.
A channel’s direct out can only be taken before the fader
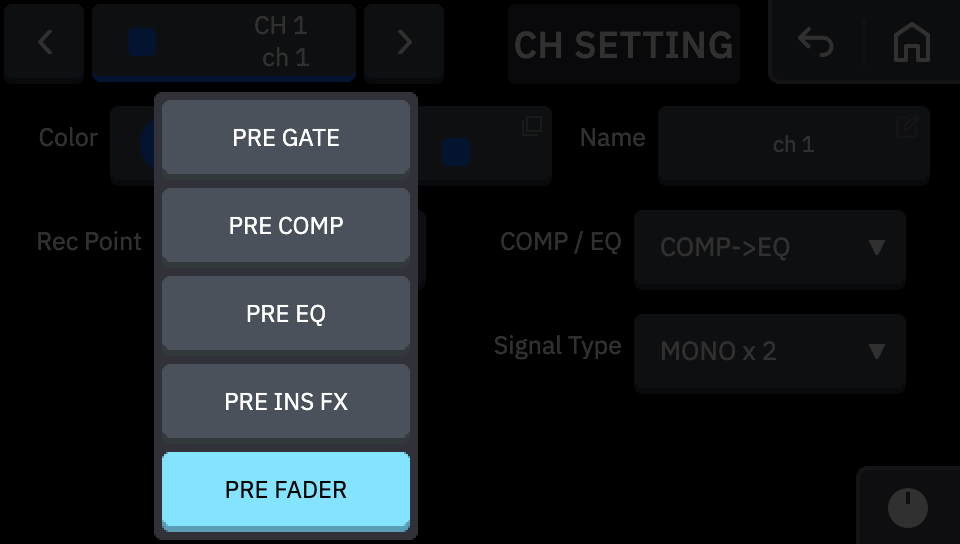
A channel can be sent directly, without going through a bus, to the USB outputs (USB MAIN / SUB) and to microSD recording. However, where that signal is taken is set by the channel’s Rec Point, and only stages before the fader can be selected (PRE FADER at the latest). So neither fader moves nor the Ducker affect a direct out. More on this in “Recommended settings”.
Each output can only select from a limited set of sources
| Output | Selectable sources |
|---|---|
| USB MAIN A / B / C, USB SUB | One of STEREO / STREAMING / MIX 1 / MIX 2 / each channel / a mono channel pair (CH1/2, CH3/4), or none. Any two channels cannot be combined |
| USB DAW OUT (for DAW recording) | Fixed as CH n → USB DAW OUT n. Cannot be changed |
| STREAMING | One of STEREO / MIX 1 / MIX 2 (“none” cannot be selected) |
| MONITOR 1 / 2 | One of STEREO / MIX 1 / MIX 2, or none |
| MAIN OUT / LINE OUT | One of STEREO / MIX 1 / MIX 2 / STREAMING / MONITOR 1 / MONITOR 2 (the URX22 has MAIN OUT only) |
| PHONES 1 / 2 / HEADSET | Fixed to MONITOR 1 / MONITOR 2 / MONITOR 1 |
STREAMING in the table is the output channel for streaming. It takes one of STEREO / MIX 1 / MIX 2 as its source, applies DELAY (1–1000 ms), and can be sent out to MAIN OUT / LINE OUT or a USB output.
The [MONO] button that makes an output mono exists only on MONITOR 1 / 2, not on MAIN OUT or LINE OUT themselves. The setting for checking mono on speakers is described as a supplement at the end of “Recommended settings”.
Only some channels have a Ducker
There are only four Duckers, one on each stereo channel (CH5/6, 7/8, 9/10, 11/12 on the URX44 / URX44V). The mono channels have none. Each Ducker can take only one source as its key (trigger) (how to duck for several voices is described in “Recommended settings”).
Raising the sample rate disables many things
At 48 kHz, the rate commonly used for streaming, everything in the table below is available. Care is needed when you go to 88.2 kHz or higher. INS FX in the table is an effect inserted in the middle of a channel’s signal (an insert effect). The effect on the microSD recording track count is described under “microSD” in “Known bugs”.
| What becomes unavailable | Condition |
|---|---|
| PITCH FIX (INS FX) | Above 48 kHz (88.2 / 96 kHz) |
| All INS FX | Above 96 kHz |
| FX 2 | Above 96 kHz |
| EQ on stereo channels (CH5/6–11/12) | 176.4 / 192 kHz |
Output assignments cannot be switched by scenes
The unit’s scenes store mixing settings (input channel processing, sends, faders and PAN, MIX / FX bus settings, INS FX, channel names and so on). In Standard Mode, the following settings are not part of a scene and do not change when you store or recall a scene.
- MONITOR 1 / 2 source, level and mono; PHONES level
- Output patch, USB output sources, microSD recording sources
- STREAMING output, oscillator
- Sample rate, system settings (brightness, USER DEFINED KNOBS, date and time)
DAW Integration and the Stream Deck plugin control only a narrow range
The URX has no official application, like dspMixFx for the UR-C / URX-C series, for controlling all of the unit’s settings from a PC. The official means and how far each one reaches are as follows.
DAW Integration takes functions away from the unit while it runs
When you launch Cubase / Nuendo / MixKey and link it with the unit, DAW Integration becomes active and you can operate the unit from the software. However, according to “About the DAW Integration operating limitations” in the user guide, the following functions are mainly unavailable while it is active.
MixKey is Steinberg’s audio mixer software for streamers, and the Mac / Windows versions are a free download (MixKey official page). The user guide only names it as software supported by DAW Integration and does not say what kind of software it is.
- The STEREO bus and the STEREO channel
- Scene functions
- microSD recorder functions
- USB DAW as an input source for each channel (the signal from the DAW connects directly to the MIX and FX buses)
Quitting the software ends DAW Integration and returns the unit to Standard Mode. In other words, DAW Integration is a mechanism for using the unit in a changed configuration only while the DAW is running. It does not suit you if you want to keep using a streaming mix together with the STEREO bus or microSD recording at all times.
Simple Mode is one of the unit’s two operation modes. Choosing one of the use cases “Live music, event”, “Streaming” or “DAW recording” starts you with routing for that use case, and operation centers on adjusting volume balance and sound character. The user guide (“Operation Mode settings” and “Simple Mode operation guide”) only says that “available functionality is specified based on use cases prepared in advance”; it gives no list of which functions are unavailable compared with Standard Mode. Also, switching from Standard Mode to Simple Mode discards the Standard Mode settings.
The Stream Deck plugin offers only on/off and step operations
The actions of the official Stream Deck plugin (Yamaha MGX/URX Plugin) are mainly one-button toggles and one-step moves: raising and lowering channel / bus levels, on/off, CUE, raising and lowering PAN/BAL, turning processing such as HPF, GATE, COMP, EQ, INS FX and Ducker on/off, selecting STREAMING / MONITOR sources, and so on. The inner parameters of EQ and dynamics and the routing cannot be edited, and faders cannot be moved continuously. Even the latest version, 1.1.1, has no actions for the Stream Deck+ dials (the marketplace lists “Dial support: No”).
Comparing the official means
| Means | What it can do | Constraints |
|---|---|---|
| The unit’s screen | All settings | The mixer screen shows at most 4 channels at once. No screen gives an overview of the signal flow |
| dspMixFx | — | The URX series is not supported (it supports the UR-C / URX-C) |
| Cubase / Nuendo / MixKey (DAW Integration) | Operation from the software’s screen | Only while the software runs. While active, the STEREO bus, scenes and the microSD recorder cannot be used |
| Stream Deck plugin | Raising and lowering levels, on/off, processing on/off, source selection | Parameter contents and routing cannot be edited. No actions for dials |
Settings even the unofficial URX Router cannot change
To fill this gap I built URX Router. It is a free application for Windows 11 and Apple silicon macOS that can read and write the unit’s settings, keep the PC and the unit in sync with live sync, and draw the routing as a diagram (distributed on GitHub / Gumroad). Yamaha is a Japanese company that has released many good products, and part of my motivation was wanting to support it.
However, even through the route URX Router uses, via Device Center (included in TOOLS for MGX / URX), the following items cannot be changed or read.
Follow USB in the table is the setting that decides whether the unit or the computer leads the clock.
| Item | Status | What to do |
|---|---|---|
| PRE/POST of channel → FX 1 / FX 2 sends | Writes are rejected (PRE/POST of channel → MIX and FX channel → MIX can be written) | Set it on the unit’s screen |
| microSD recorder Track Count | The range of values Device Center exposes is narrower than what the unit offers; from a PC only “2 tracks” and a value that leaves nothing selected on the unit’s screen can be written | Set it on the unit’s screen |
| Sample rate (while the unit’s Follow USB is on) | The rate buttons are locked on the unit’s screen, but a write from the PC is accepted rather than rejected and is reverted to the computer’s rate about 0.4 s later. The only result is a momentary audio dropout for a change that does not stick (Follow USB is on by default) | To change the rate from a PC, turn Follow USB off first |
| The unit’s clock | Device Center does not expose it as a settable value | Set it on the unit’s screen |
Recommended settings
To make the Ducker apply to the stream, assign a bus (STEREO / MIX) to the USB output
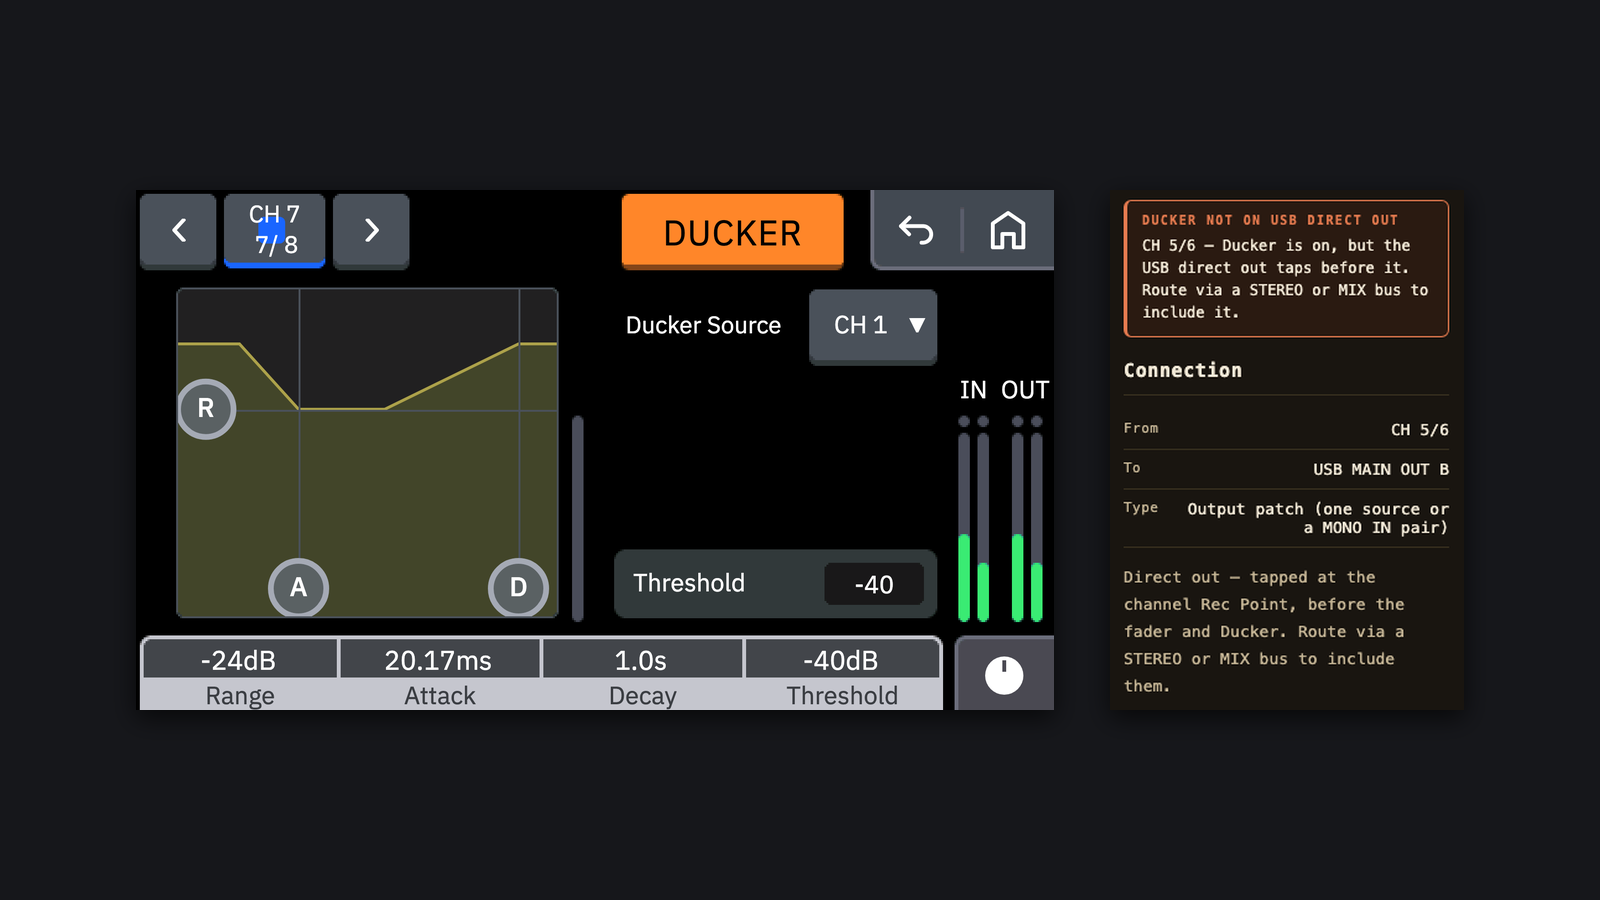
What needs care is that the Ducker sits after the channel’s fader. A channel’s direct out is taken at the Rec Point (before the fader), so it does not pass through the Ducker. For example, if you assign the BGM channel directly to a USB output and send it to streaming software such as OBS, the BGM sounds lowered on the unit’s monitor, but the stream carries BGM that has not been lowered. You are tempted to assign a channel directly to a USB output when you want each source on a separate track in OBS (to record only the mic, or only the BGM). For sources where a signal that bypasses the fader and the Ducker is fine (such as a mic-only track), a direct assignment causes no problem.
In the comments on a URX44V review video, someone also posted the question “ducking works on the monitor output but not on the signal sent over USB to the PC (OBS stream)” (in Italian; paraphrased). I think it is quite hard to notice this difference from the unit’s screen.
By default, the sources of USB MAIN A / B / C, USB SUB and STREAMING are all STEREO, so if STEREO is the mix for the stream, you do not need to change the output settings. I recommend the following.
- Put the sound you want to lower, such as BGM, on a stereo channel (CH5/6–11/12)
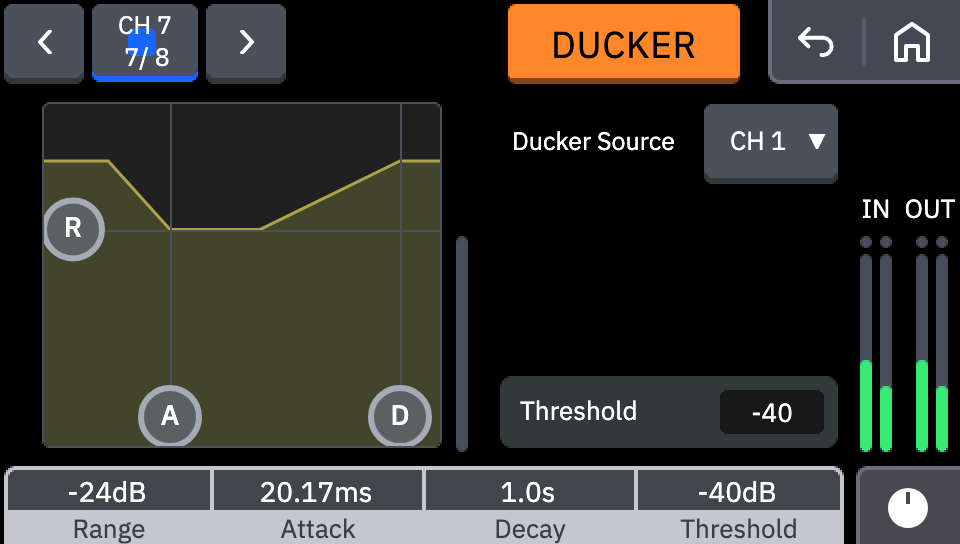
- Turn that channel’s Ducker on and select the mic channel as the key source. On the HOME screen, touch the channel name area to open the channel view, and turn it on with the [DUCKER] button in the DUCKER area. Touching the DUCKER area outside the button twice opens the DUCKER screen; select the mic channel in [Ducker Source], and set Threshold (lowering starts when the key exceeds it) and Range (how much to lower)
- Set the level each channel contributes to the stream with its fader. A channel’s sound enters STEREO after passing through the fader and the Ducker, so the stream carries the ducked sound
- Leave the source of the USB output that goes to the streaming software (USB MAIN A or similar) at the default, STEREO. If you have changed it, open the SETUP screen with the SETUP button in the toolbar and set it back to STEREO under [USB] in the [Output Patch] menu. If you use the streaming delay, leave the STREAMING source at STEREO and set the USB output’s source to STREAMING
- Do not assign a channel whose Ducker is on directly to a USB output
The sources of MONITOR 1 / 2 are also STEREO by default, so what you hear in your headphones is exactly what goes to the stream. If you want to hear something different from the stream (for example, your own voice quieter), use a MIX bus to build your own mix and set the MONITOR’s Source to that MIX under [Setting] in the [Monitor] menu of the MONITOR screen. If you also use the multi-voice Ducker setup and the call-return setup, however, you run out of buses.
When you record to microSD at the same time, select a bus (STEREO or MIX) as the track source to record the ducked sound.
URX Router shows a warning when a channel whose Ducker is on is assigned directly to a USB output.
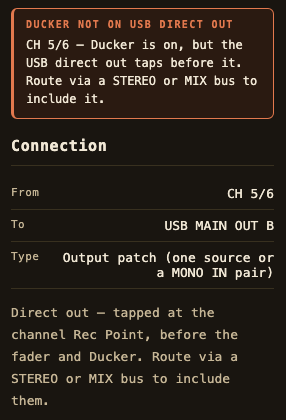
This warning appears only for a direct assignment to a USB output, not for one to microSD recording.
When you mute the mic, turn the Ducker off as well
When a channel is selected as the Ducker key, the key is taken at that channel’s Rec Point (before the fader). So even if you lower the mic channel’s fader or mute it (turn ON off), the Ducker keeps lowering the BGM as long as sound enters the mic. On the URX44V, with the key channel CH3’s fader at -∞ and with its ON turned off, the Ducker kept lowering by -24 dB, as set by Range, in both cases.
To bring the BGM back to its normal level while the mic is muted, turn the Ducker off as well. The official Stream Deck plugin has on/off actions for both the channel and the Ducker, and if you put the two into a Stream Deck Multi Action (a feature that assigns several actions to one key in order; Elgato’s guide), a single press toggles both the mic mute and the Ducker (I have confirmed this). If you send the voices to a MIX bus and use that MIX bus as the key, as in the next section, muting the mic also stops the Ducker.
For multiple voices, key the Ducker from a MIX bus; for a stereo key, raise the threshold
Besides mono channels, the Ducker key can be a stereo channel or the STEREO / MIX bus. With a stereo source as the key, the Ducker judges by L and R added together (neither the average nor the larger side, but the sum). So a centered sound, with the same sound in L and R, is judged 6 dB louder than the same sound on one side only. For unrelated sounds in L and R, how much louder it is judged depends on the material and is not a fixed value. When a stereo source is the key, raise the threshold as follows.
- If the key is mainly sound that is the same in L and R (centered sound), set it 6 dB higher than a value chosen for the same sound on one side only
- If L and R carry unrelated sounds, decide while playing the actual sound and watching where the lowering starts
Keying from a MIX bus lets several voices lower the same sound. Send only the voices, POST, to the MIX bus used for the key (MIX 2 in this article), and set the Ducker key to that MIX bus. On the URX44V, any voice sent to MIX 2 lowered the sound as set by Range, and a voice whose send was turned off did not. Because the key passes through a POST send, unlike keying the channel directly (the previous section), setting the mic’s fader to -∞ or turning its ON off also stops the Ducker.
Set the threshold 3 dB higher than when the mic channel itself was the key (a difference measured on the URX44V). The 6 dB above is relative to sound on one side only; relative to a mono channel used directly as the key, it is 3 dB.
Build the sound returned to a call on MIX 1
When you stream while on a call, you return to the call app a mix without the other person’s voice. If STEREO is for the stream and MIX 2 is the Ducker key, use the remaining MIX 1 for the sound returned to the call.
- Send the channels you want to return (your mic, the BGM and so on) to MIX 1. Open the SEND TO screen with the [SEND TO] button in the channel view, select [MIX 1-2] on the right, check that MIX 1’s [ON] is lit, and raise Level with [PRE] left unlit (POST). The send starts at -∞
- Do not send the channel carrying the other person’s audio to MIX 1 (turn MIX 1’s [ON] off)
- Set the source of the USB output used by the call app (USB MAIN B or similar, separate from the one for the streaming software) to MIX 1. Note that LINE OUT’s source is MIX 1 by default, so if something is connected to LINE OUT, the call-return mix comes out there too
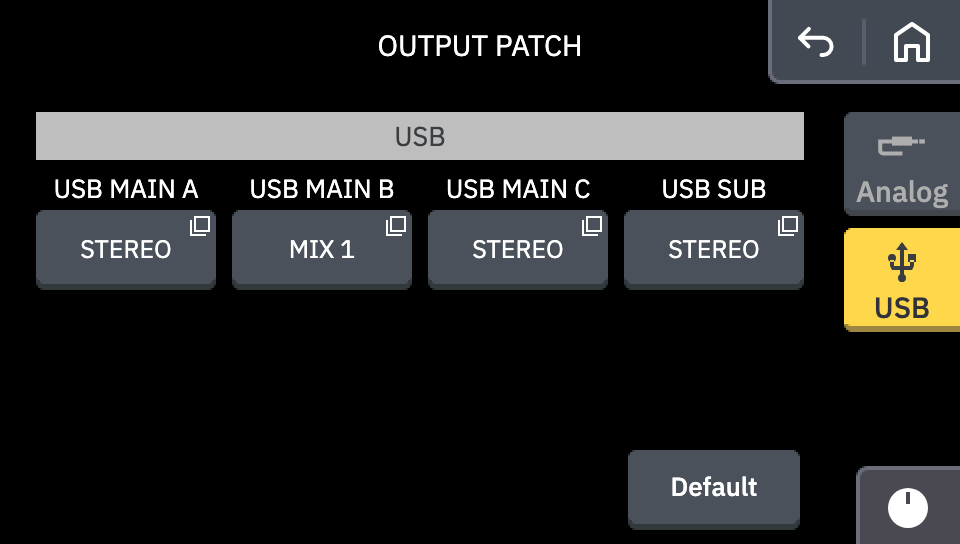
If returning only your own voice is enough, you can also assign the mic channel directly to a USB output. This signal is taken before the fader (at the Rec Point), however, so the other person keeps hearing you even when you mute the mic. On the URX44V, the USB output level did not change when ON was turned off or the fader was set to -∞.
To use an output COMPANDER as a safety net, insert it on the bus for the stream with settings that barely affect the sound
The COMPANDER on an output channel (STEREO / MIX) holds the output’s sample values just below 0 dBFS. To use this as a safety net against loud sounds, set it up as follows. The measurement details and the limits of this approach are in “Personal complaints”.
- Insert it on the bus that goes to the stream. If you stream from STEREO, that is STEREO’s INS FX (switch the HOME screen’s bank to the output side (MIX, ST STREAMING), and on STEREO’s channel screen select Compander-H or Compander-S under EFFECT TYPE in INS FX)
- Set Threshold 0 dB, Ratio 1:1, Width 90 dB, Attack 0 ms. The COMPANDER also works as a compressor and an expander, so if you leave Threshold and the rest at their defaults, it acts on the whole sound even though you inserted it only as a safety net. With these settings the everyday sound barely changes, and loud sounds are held from the very start without clipping (all checked with sine waves only). After holding, it takes a moment to return to the original level: right after a 0.3 s loud sound, a -20 dBFS sound took about 0.28 s with COMPANDER-S (default Release 165 ms) and about 0.39 s with COMPANDER-H (229 ms) to come back within 0.5 dB of its level
- To lower the level it holds at, lower Gain (as shown on screen; Out Gain in the Effect Reference Guide). The holding level drops by the same amount
- It cannot hold true peaks, so keep a limiter on the OBS side as well
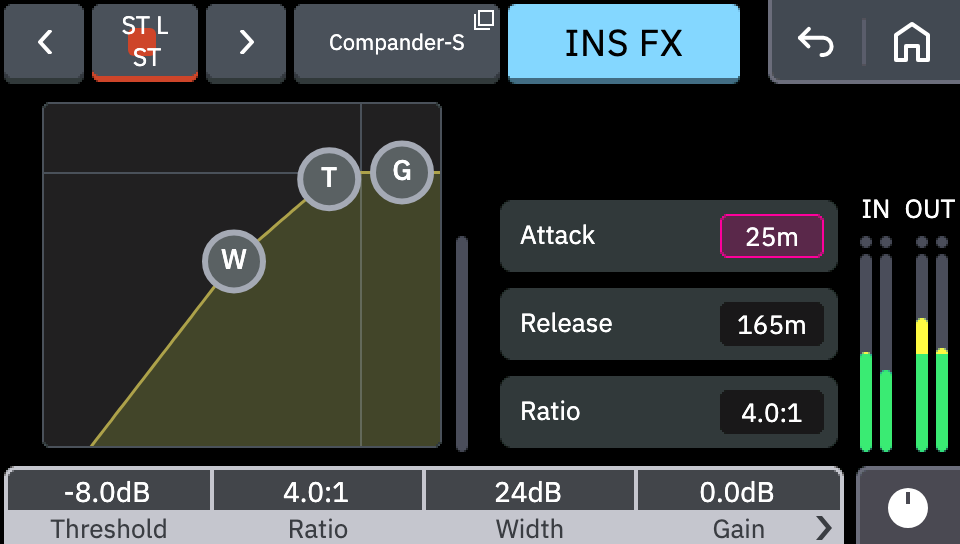
Do not rely on Clip Safe; leave headroom in A.Gain
The user guide describes the mic input’s [Clip Safe] as “When this is on, the gain is automatically lowered to avoid clipping when excessive input is detected.” But when I made the URX44V clip by clapping, Clip Safe started lowering the input about 2 seconds after the last clip. That is too late to prevent momentary clipping from a sudden loud voice, so do not rely on Clip Safe; keep A.Gain low enough that even a loud voice does not clip. As a guide, actually make the loudest sound you might make during a stream (laughing, a surprised shout) and set A.Gain so that the input meter in the channel view’s input area stays below 0 dB. The [Clip Safe] button and the [A.Gain] knob are on the channel’s INPUT screen.
Supplement: making MONO available on the speaker output
Sometimes you want to check how the stream sounds when played back in mono, but by default MAIN OUT’s source is STEREO, so the speakers connected to MAIN OUT cannot be made mono.
So change the setup to drive the speakers through a MONITOR.
- Open the MONITOR screen with the MONITOR button in the toolbar, and under [Setting] in the [Monitor] menu set MONITOR 1’s Source to STEREO (or the mix you want to hear)
- Open the SETUP screen with the SETUP button in the toolbar, and under [Analog] in the [Output Patch] menu set the source of MAIN OUT (the output the speakers are connected to) to MONITOR 1
- Switch the speakers to mono with MONITOR 1’s [MONO] button under [Setting] on the MONITOR screen
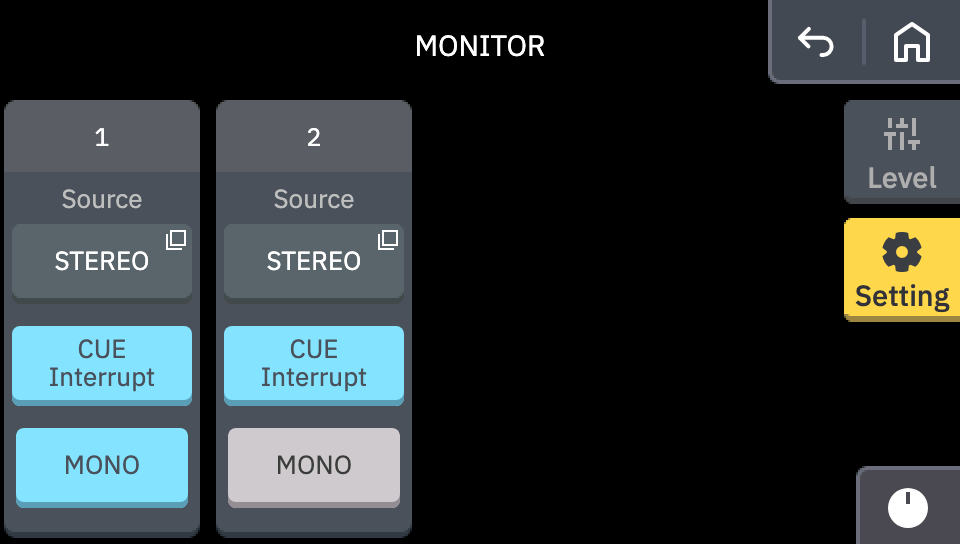
This setup has the following effects.
- Turning on MONITOR 1’s [MONO] also makes PHONES 1 and the HEADSET jack (both fixed to MONITOR 1) mono. If you want to keep your headphones in stereo, connect them to PHONES 2 (MONITOR 2).
- The speaker volume also follows MONITOR 1’s level.
- The MONITOR’s [CUE Interrupt] is on by default, and while it is on, pressing CUE on any channel replaces the speaker sound with the CUE sound too. To avoid that, turn [CUE Interrupt] off.
[MONO] combines L and R by adding them and lowering by 3 dB, so a centered sound becomes 3 dB louder than in stereo, and a sound panned to one side becomes 3 dB quieter (values measured at the URX44V’s MAIN OUT).
Personal complaints
No limiter that reliably works on true peaks before USB MAIN
To start with the conclusion: inside the URX, the best you can do is hold the output’s sample values just short of 0 dBFS. The true peak (the height of the peak the actual waveform reaches between samples; dBTP is that expressed in dB) goes above 0 dBTP, so the final peak control has to be left to the limiter in streaming software such as OBS. The reasons follow.
For streaming, you want the sound that reaches streaming software such as OBS to stay below 0 dBFS. The audio the URX44V sends to the computer over USB MAIN is in 32-bit integer format. This is the specification of the unit’s USB MAIN and is the same on Windows and macOS (on macOS, CoreAudio reports it as the format of the Yamaha URX44V A / B / C streams). An integer format cannot represent values above 0 dBFS, so any sound that exceeds 0 dBFS inside the URX is already clipped by the time it reaches OBS. In fact, when I recorded a 1 kHz tone that reached +6 dBFS on MIX 2 through USB MAIN C, about 60% of the samples were stuck at full scale. A clipped waveform cannot be restored afterwards, so a filter in OBS cannot remove this distortion.
The COMPANDER-H / COMPANDER-S that can be inserted in an output channel’s (STEREO / MIX) INS FX are described on page 10 of the Effect Reference Guide (PDF) as effects combining a compressor, an expander and a limiter. Measured on the URX44V, the COMPANDER holds the output just below 0 dBFS independently of Ratio. Even with the flattened curve described in “Recommended settings”, a -20 dBFS sound passed at the same level as with no insert (a difference of 0.00 dB), and a +6 dBFS sound was held at -0.7 to -0.8 dBFS, including at its abrupt start (both COMPANDER-H and -S; checked only with steady sine waves). Even so, it cannot serve as a true-peak limiter that reliably works in front of the streaming software.
- What it holds is the sample values, not the peaks that occur between samples (true peaks). Measured with a 12 kHz tone whose samples sit 3 dB below the waveform’s crests, the output’s sample peak was -0.77 dBFS, but the true peak found by oversampling (recomputing finely by filling in between samples) was +2.26 dBTP, above 0 dBTP (see also my earlier article on loudness about true peak). The guide has no setting or description for detecting true peaks either.
- There is no look-ahead setting (look-ahead: a mechanism that starts lowering the level slightly before the sound arrives), and the guide does not mention look-ahead. COMPANDER-S has a default Attack (the time from crossing the threshold until it takes full effect) of 25 ms, and when a +6 dBFS sound was put in abruptly with that setting, the output stuck at full scale for about the first 0.1 s. With Attack at 0 ms, and with COMPANDER-H (default Attack 1 ms), even the start did not clip.
- There is no setting for the holding level itself. Lowering Gain lowers the holding level by the same amount (with Gain at 0 / -3 / -6 dB, the output’s sample peak was -0.77 / -3.77 / -6.78 dBFS), so you can lower it indirectly with Gain, but Gain lowers the whole output, including sound below the threshold. The guide does not say at what level it holds.
- Only one dynamics effect can be used on an output channel: COMPANDER-H, COMPANDER-S or M.B.Comp (User Guide (PDF), page 184, “Effect list”). M.B.Comp cannot set Threshold above -6 dB (Effect Reference Guide, page 12), so it cannot be set to act only just below 0 dBFS, and it always acts on sound above -6 dB.
For example, if you want to keep the true peak at or below -3 dBTP, all the COMPANDER lets you decide is the level at which it holds the sample values (moved with Gain). How far the true peak exceeds the sample values depends on the material, and lowering the holding level to allow for that difference makes the whole output quieter by the same amount. With the 12 kHz tone above, the true peak only reached -3.75 dBTP once Gain was set to -6 dB.
The LCD cannot show input channels and buses on the same screen
The main area of the HOME screen shows 4 channels at once, and which ones is decided by the channel bank (CH 1 – 4 / CH 5 – 12 / FX 1 – 2 / MIX, ST STREAMING) (User Guide (PDF), page 47, “Channel bank”). The contents of a bank cannot be changed, so input channels and buses cannot be shown on the same screen.
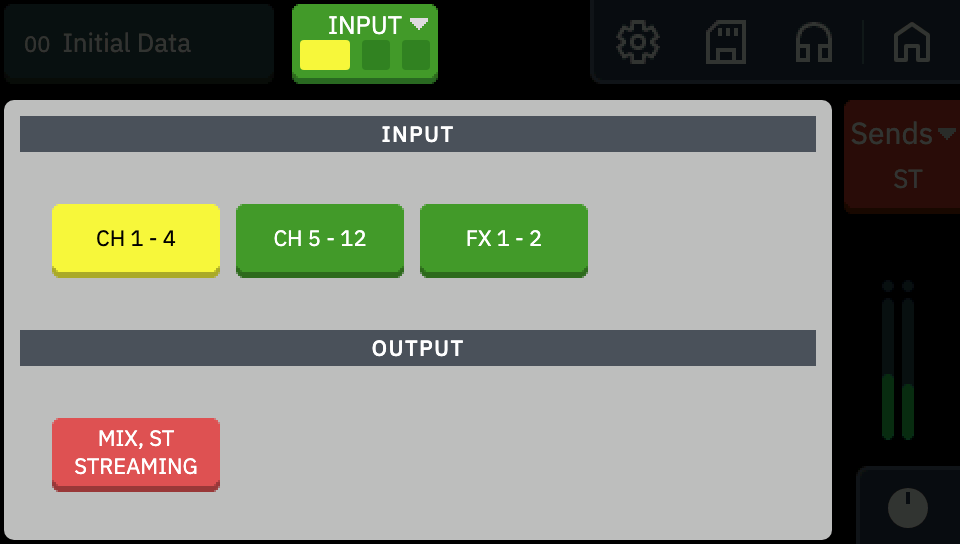
After adjusting an input such as the mic with User Defined Knobs (a feature that assigns any parameter to the unit’s knobs) during a stream, checking the levels of the MIX or STREAMING going to the stream requires switching from the input bank to the output bank. Swiping left/right cannot switch between input and output banks (the NOTE on the same page), so each time it takes two operations: pressing the channel bank button in the toolbar and then choosing the bank.
Known bugs
The user guide and the unit’s behavior often disagree
There are several places where the user guide’s description and the unit’s behavior do not match.
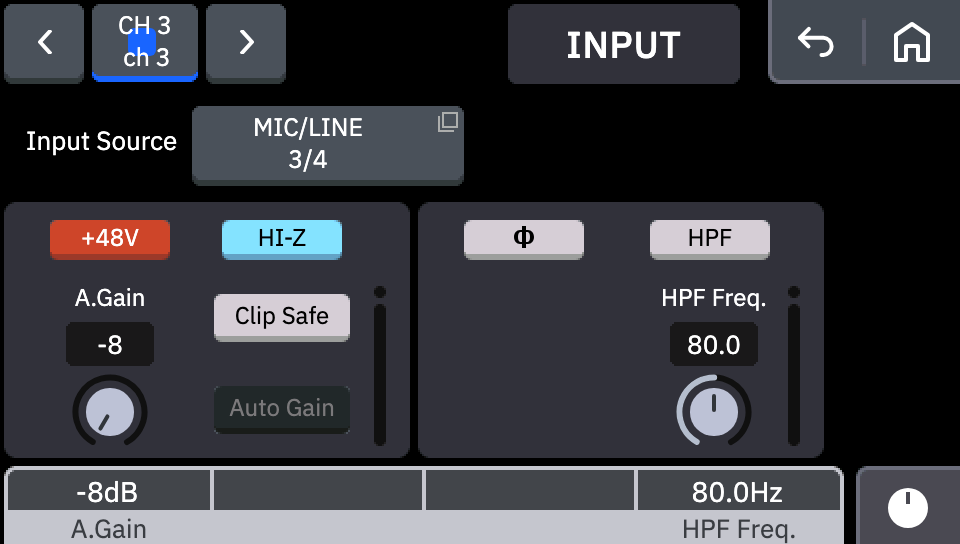
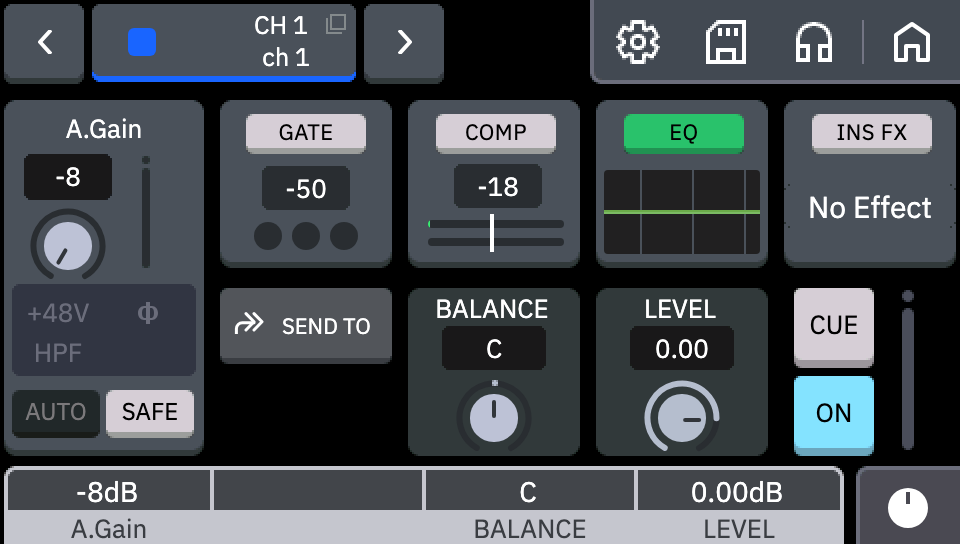
- +48V and HI-Z: The description of the [+48V] button on the INPUT screen says “The phantom power supply and HI-Z cannot be turned on at the same time.” On the actual unit, pressing [HI-Z] with [+48V] on, or pressing [+48V] with [HI-Z] on, turns both on. URX Router does not let you turn one on while the other is on.
- LEVEL meter of stereo-linked channels: For the LEVEL meter in the channel view, the guide says “Stereo channels and channels that are stereo-linked are shown with a stereo meter.” On the actual unit, the LEVEL meter in the main area is a single meter even when a stereo-linked pair is selected, and the HOME screen also shows one per channel.
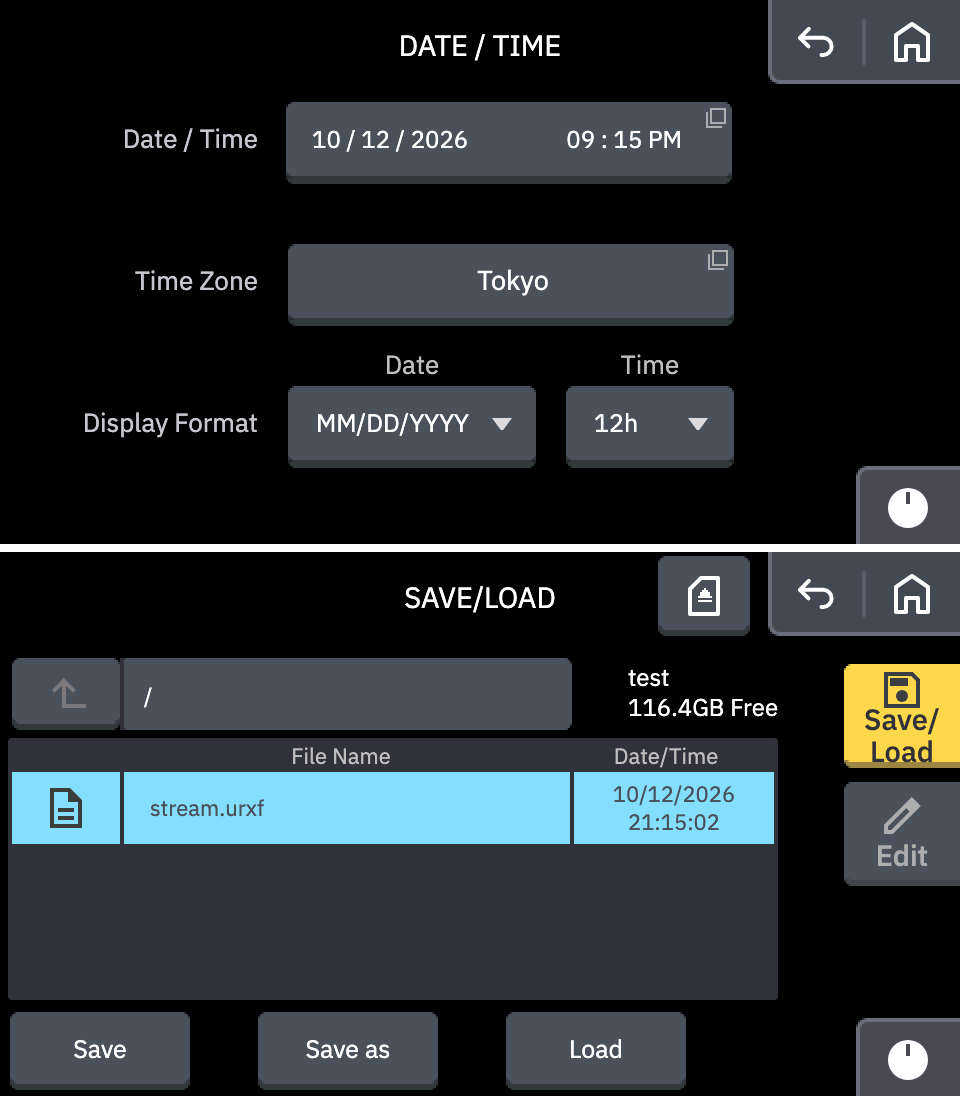
- Time display format: The Time button of [Display Format] in the Date/Time menu “Selects the display format for the time.” However, in the Date/Time column of the file list on the microSD SAVE/LOAD screen, the date follows the Date setting while the time stays in 24-hour format even with Time set to 12h.
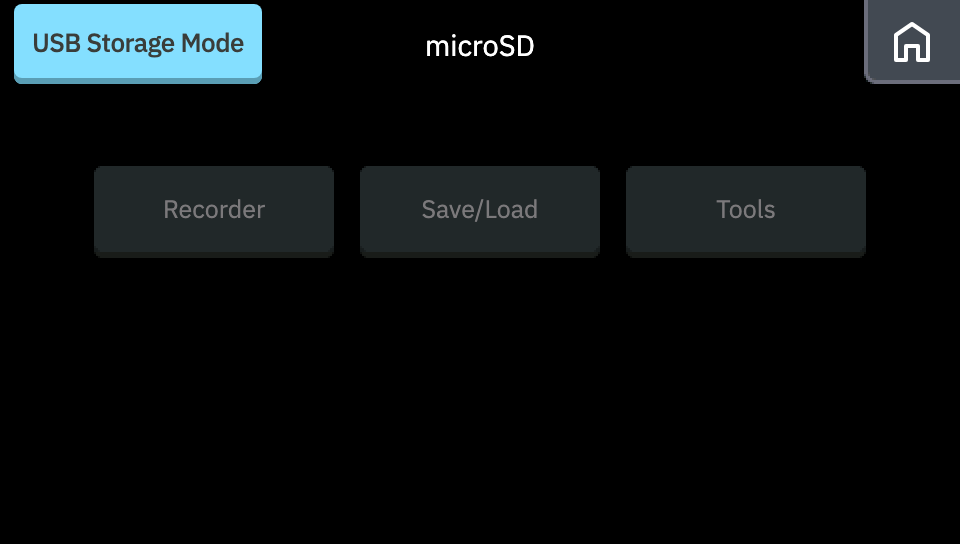
- USB Storage Mode: The NOTE for the USB Storage Mode button says “You cannot access any other menus from this product while USB Storage Mode is on.” but does not say how far “other menus” extends. On the actual unit, you can open HOME, SETUP, MONITOR and each channel’s screens with the mode on.
The unit’s clock
The URX44V / URX44 have a built-in clock, and the date and time of microSD recordings are recorded with it (the URX22 has no microSD recording and no Date/Time menu at all).
- Cannot be set from the computer’s time: The clock can only be set from SETUP > Date/Time on the unit, and it does not sync with the time of the computer connected over USB. When it drifts, you have to set it again by hand on the unit’s screen. When the internal clock battery runs down, the clock stops, and you are to ask the vendor or a repair service center to replace it (User Guide (PDF), page 175, “Troubleshooting (other issues)”, “microSD card recording date/time values are not set correctly”).
- No daylight saving time support: The clock holds a single UTC offset for each city chosen in [Time Zone] and uses the same offset all year round. For example, at 21:15 in Tokyo in September, switching to London showed 12:15 (the actual time in London at that time of year is 13:15). In regions with daylight saving time, recording timestamps are one hour off during the summer.
microSD
- Long file names that can be typed but are not saved: [Rename] on the SAVE/LOAD screen accepts a long name but does not save it, and [New folder] truncates a long name when creating the folder.
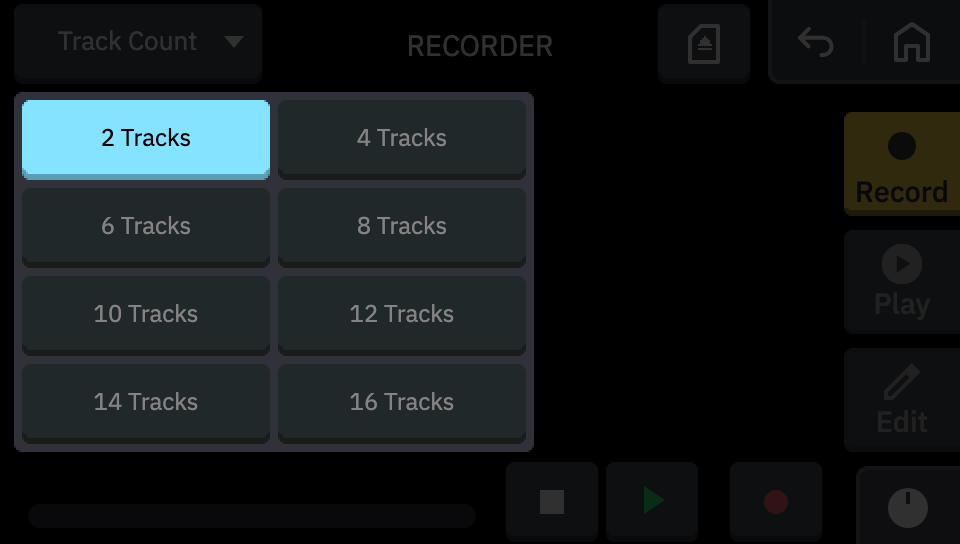
- Track Count does not come back when the sample rate is restored: The microSD recorder’s Track Count (the number of tracks to record) has a maximum for each sample rate: 16 at 44.1 / 48 kHz, 8 at 88.2 / 96 kHz, and 2 at 176.4 / 192 kHz. Raising the sample rate lowers a Track Count above the maximum down to that maximum, and it stays lowered even after the sample rate is set back. To restore it, set it again in the microSD screen → RECORDER menu → [Track Count].
Related documents
The items listed here are also recorded as known issues and differences from the actual unit in the URX Router and URX LCD Simulator repositories.
- URX Router: Known issues
- URX LCD Simulator: What this simulator does not build (known issues)
Yamaha, URX, Cubase, Nuendo and MixKey are trademarks or registered trademarks of Yamaha Corporation or Steinberg Media Technologies GmbH. Stream Deck is a trademark of CORSAIR (Elgato). URX Router and URX LCD Simulator are unofficial tools and are not affiliated with any of these companies.

コメント